
Grilled Cheese Roll Ups: A Fun Twist on a Classic Favorite
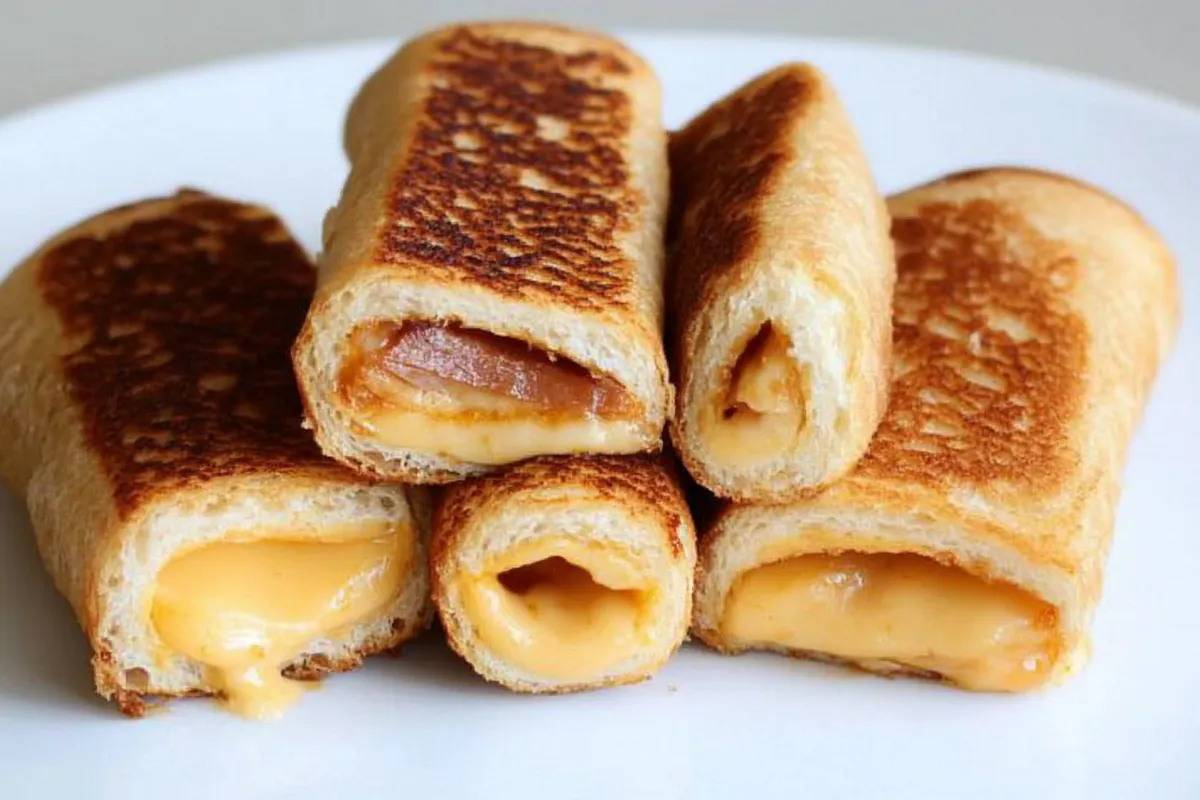
If you’re on the lookout for a delightful twist on a classic comfort food, Grilled Cheese Roll Ups may just become your new favorite. This fun and easy dish takes the beloved grilled cheese sandwich and transforms it into a delightful roll, perfect for dipping or snacking. The appeal lies not just in their delectable cheesy flavor and crispy texture, but also in their versatility. You can add a variety of ingredients such as ham, spinach, or marinara sauce to craft your own gourmet roll-ups.
For the ultimate crispy finish, aim for a buttered skillet at the right temperature—golden brown is the goal! And if you’re feeling adventurous, why not swap out traditional cheese for a creamy brie or a spicy pepper jack? With these tips, you’ll achieve a mouthwatering result that’s sure to impress both kids and adults alike. So, gather your ingredients and get ready to roll your way into cheese heaven!
Ingredients for Grilled Cheese Roll Ups:
To create delicious grilled cheese roll ups that serve 8–10 people, you’ll need the following ingredients. Ensure you have everything on this list to enjoy a scrumptious and melty delight!
Basic Ingredients:
- 16 slices of bread: Choose soft white or whole wheat bread for the best texture. You can also use gluten-free bread if required.
- 8 ounces of cheddar cheese: Shredded sharp or mild cheddar gives a classic flavor. Feel free to mix in other cheeses like mozzarella or Monterey Jack for a melty combination.
- 4 ounces of cream cheese: This adds a rich and creamy texture. Plain or flavored varieties such as garlic or herb can enhance the taste.
- 4 tablespoons of butter: Softened for easy spreading when grilling. You may want to use garlic butter or herb-infused butter for added flavor.
Optional Flavor Enhancements:
- 2 tablespoons of fresh herbs: Chopped basil, parsley, or chives can be mixed with cream cheese to add freshness.
- 1 teaspoon of garlic powder: For an added kick, include garlic powder or minced garlic in your melted cheese mix.
- 1 teaspoon of mustard: Spread a thin layer of yellow or Dijon mustard on the bread for a tangy twist.
Dipping Sauces (Optional):
- 1 cup of marinara sauce: This classic dipping sauce complements the cheesy flavor and adds a hint of acidity.
- 1 cup of ranch dressing: A creamy and zesty dip that pairs well with the grilled cheese rolls for a fun flavor contrast.
Variations for Different Tastes:
- Tex-Mex Version: Add sliced jalapeños and pepper jack cheese for a spicy kick.
- Veggie Delight: Incorporate spinach, roasted red peppers, or artichokes for a healthier twist.
- Sweet and Savory: Try using brioche bread with a layer of Nutella and mozzarella cheese for an indulgent treat.
Now that you have gathered all the necessary ingredients, you’re just one step away from creating these delightful roll ups!
How to prepare Grilled Cheese Roll Ups:
Making Grilled Cheese Roll Ups is a fun and easy process that both kids and adults will enjoy. Follow these clear steps to create a delicious cheesy treat.
Gather the Ingredients for Grilled Cheese Roll Ups
Begin by collecting all necessary ingredients. You will need slices of bread (preferably white or whole grain), cheese (like Cheddar or American), and butter. Extras such as garlic powder or herbs can enhance the flavor.
Flatten the Bread Slices
Next, take a rolling pin and flatten each slice of bread. Aim for a thickness of about 1/4 inch. This will help you roll them up easily later on.
Add Cheese to the Bread
Place a slice of cheese on top of each flattened bread slice. You can use one slice or layer multiple slices for a cheesier experience. Adjust the amount based on your preference.
Roll Up the Bread
Starting from one end, carefully roll the bread slice tightly around the cheese. Make sure to roll it evenly to maintain the shape and keep the cheese secure.
Secure the Roll Up
To ensure the roll does not unravel, apply a small amount of softened butter on the edge. This will help to seal it closed.
Heat the Pan
In a skillet or frying pan, melt a tablespoon of butter over medium heat. Swirl the butter around the pan until it fully coats the bottom.
Grill the Roll Ups
Place the cheese roll ups seam-side down in the hot skillet. Cook until golden brown, which should take about 2-3 minutes.
Flip and Cook Thoroughly
Gently flip the roll ups with tongs or a spatula. Allow them to grill on the other side for another 2-3 minutes until crispy and the cheese melts.
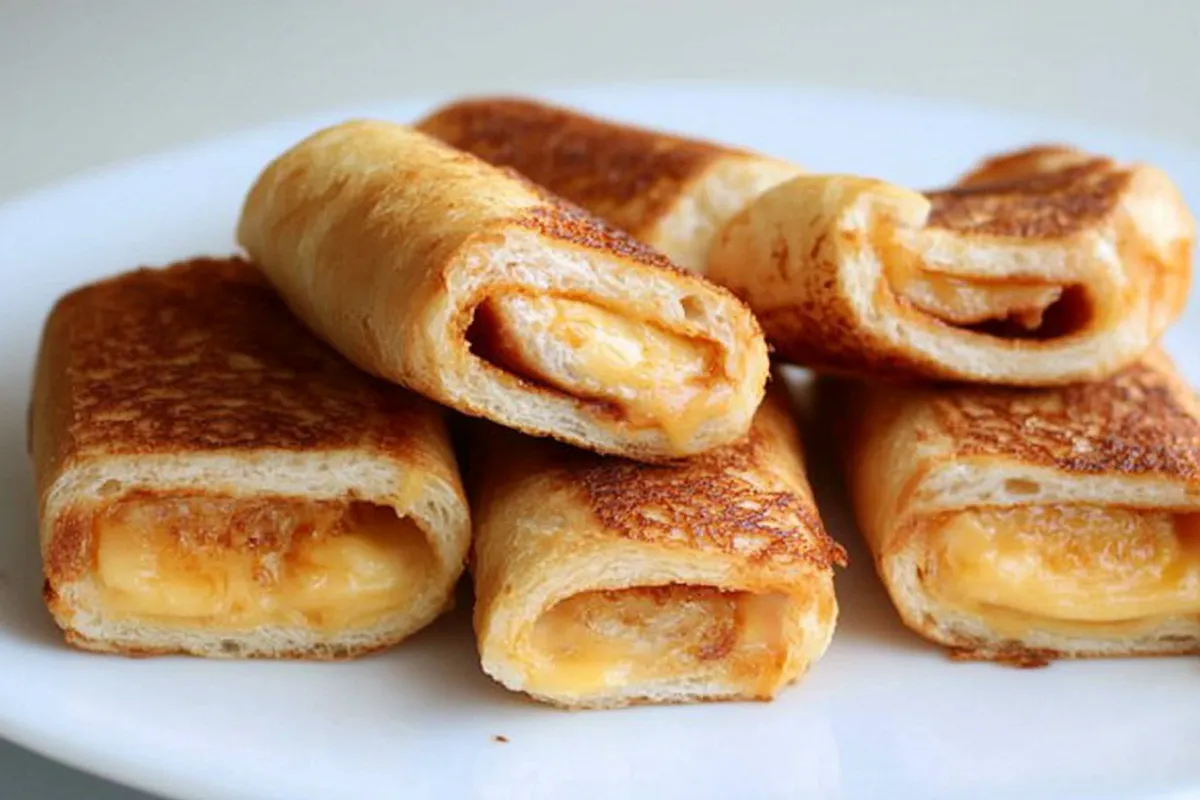
Serve and Enjoy
Once done, carefully remove the roll ups from the skillet and place them on a plate. Let them cool for a couple of minutes before slicing them for easy dipping. Enjoy your scrumptious creation!
Tips for the Perfect Grilled Cheese Roll Ups
Creating delicious grilled cheese roll ups is simple if you follow these helpful tips. The key is to focus on ingredients, temperature, and technique. With the right approach, these snacks can become a favorite in your kitchen.
Maintain the Right Temperature
Temperature control is crucial when making grilled cheese roll ups. Use medium heat on your stovetop. If the heat is too high, the bread may burn before the cheese melts. Preheat your skillet for a few minutes before adding the roll-ups. Conduct a simple test by dropping a small piece of bread in the pan; if it sizzles immediately, the temperature is just right.
Select Quality Ingredients
The success of your roll ups depends largely on the ingredients you choose. Start with fresh bread; soft white or whole grain are good choices. Look for cheeses that melt well, such as cheddar, mozzarella, or American. For a richer flavor, consider adding a slice of smoked cheese. Fresh herbs or spices can also elevate taste, so don’t hesitate to experiment!
Creative Variations and Substitutions
If you’re catering to dietary restrictions or preferences, there are many substitutions you can make without sacrificing flavor. For gluten-free options, use gluten-free bread varieties that hold up well to grilling. Those following a dairy-free diet can try vegan cheese alternatives, which melt nicely. Additionally, for a healthier twist, consider using whole grain wraps instead of bread.
Enhancements and Add-Ins
Don’t be afraid to mix things up! Add cooked vegetables like spinach, peppers, or tomatoes inside the roll ups for added nutrition. For an extra crispy texture, consider coating the outside with a light layer of butter or olive oil. Even a sprinkle of garlic powder or paprika can enhance the flavor profile. Additionally, serve these rolls with dips like marinara or ranch for an extra kick.
Serving Suggestions
Presentation can make all the difference. Cut the grilled cheese roll ups into bite-sized pieces. Serve them on a colorful platter with fresh herbs as garnish. This not only enhances visual appeal but also makes them more enjoyable to eat. Pair these snacks with a fresh salad or soup for a complete meal.
By focusing on these essential tips, you’ll elevate your grilled cheese experience to new heights!
Storage Tips for Grilled Cheese Roll Ups:
After whipping up your delicious grilled cheese roll ups, storing them correctly is crucial to keeping them fresh and tasty. Use the following tips to maximize their shelf life and flavor.
Optimal Storage Conditions
Start by allowing your grilled cheese roll ups to cool completely. Storing warm food can lead to condensation in your storage container, causing sogginess. Once cooled, choose an airtight container to prevent air exposure, which can dry them out or make them stale. Plastic wrap and resealable bags also work well, just ensure there is minimal air left inside. If you plan on consuming them within a day, you can keep them at room temperature. For longer storage, place them in the refrigerator.
Refrigeration and Freezing
Store your grilled cheese roll ups in the refrigerator to maintain freshness for up to 3 days. Make sure you keep them sealed tightly to prevent any absorption of odors from other foods. If you want to keep them for an extended period, freezing is your best option. Wrap each roll up in plastic wrap or aluminum foil, then place them in a freezer-safe bag or container. This way, you can enjoy these treats for up to 2 months.
Reheating Tips
When you’re ready to enjoy your stored roll ups, focus on reheating them correctly to retain their crispy texture. You can use a skillet over medium heat for the best results. Heat the roll ups for a few minutes on each side, just until the cheese melts and the bread turns golden again. Alternatively, you can use an oven preheated to 350°F. Place the roll ups on a baking sheet and warm them for about 10 minutes. If you prefer a microwave, remember it may create a softer texture, so it’s not the ideal method.
Avoiding Common Mistakes
Do not slice your roll ups before storage as this can expose more surface area to air and lead to faster drying. Additionally, avoid stacking them directly on top of one another; this can result in squished roll ups. Keep them in a single layer in your container for better preservation.
By following these storage tips, you can ensure your grilled cheese roll ups remain delicious and ready to impress whenever you crave them!
Related Recipes to Enjoy with Grilled Cheese Roll Ups
Grilled Cheese Roll Ups are a fun and tasty snack. If you’re looking for similar recipes that capture the same cheesy goodness or offer delightful pairings, consider these options:
- Cheesy Garlic Breadsticks – These delicious breadsticks feature a cheesy interior and a crispy exterior, perfect for dunking in marinara sauce. They share a similar cheese element and can be a wonderful accompaniment to your roll ups, enhancing your snack time experience.
- Stuffed Quesadillas – Filled with gooey cheese and your favorite proteins or vegetables, quesadillas are easy to make and pack a flavorful punch. Their fried or grilled texture complements the crispy nature of roll ups, making them ideal for a versatile meal or snack option.
- Mini Pizza Bagels – These bite-sized treats are topped with pizza sauce and plenty of cheese. The fun shape and cheesy taste offer a different twist on a cheesy dish, appealing to both kids and adults alike. They make a great finger food alongside roll ups during a casual gathering.
- Macaroni and Cheese Bites – These small, cheesy morsels provide comfort food in a convenient format. Their creamy cheese filling and crispy exterior make them an excellent match for the crunchy yet cheesy experience of roll ups, ensuring guests enjoy every bite.
- Caprese Skewers – For a fresher option, consider skewers with mozzarella balls, cherry tomatoes, and basil. This dish adds a refreshing contrast to the richness of cheesy snacks and rounds out your platter beautifully while keeping the focus on enjoyable flavors.
Each of these recipes echoes the delightful concept of cheese, adding variety to your menu while still feeling cozy and satisfying. Enjoy exploring these complementary flavors alongside your grilled cheese roll ups!
Frequently Asked Questions:
What are Grilled Cheese Roll Ups?
Grilled Cheese Roll Ups are a playful twist on the classic grilled cheese sandwich. Instead of slicing bread, the bread itself is flattened and then rolled around melted cheese, creating a fun and portable finger food. This version is often toasted to achieve a crispy exterior while showcasing gooey, delicious cheese on the inside, making it a hit among kids and adults alike.
How do I make Grilled Cheese Roll Ups at home?
To create these delightful cheese rolls, you’ll need soft sandwich bread, cheese of your choice, and perhaps a drizzle of butter. Start by rolling the bread slices flat with a rolling pin, place a slice or two of cheese on one end, and then roll it tightly. Searing the rolls in a pan until golden brown will give them a crispy finish. Enjoy them with dipping sauces like marinara or ranch!
Can I use different types of cheese in my roll-ups?
Absolutely! While traditional options like cheddar and American cheese are popular for their meltability, feel free to experiment with a variety of cheeses. Cream cheese, mozzarella, pepper jack, or even a blend of cheeses can add a unique flavor to your roll-ups. The key is to pick cheeses that melt well, enhancing the gooey texture.
Are these roll-ups suitable for meal prepping?
Yes, Grilled Cheese Roll Ups are great for meal prepping! You can prepare them ahead of time and store them in the fridge. Just make sure they are wrapped properly to maintain freshness. When you’re ready to eat, they can easily be reheated in a skillet or microwave, making them a quick snack or meal option.
What are some creative fillings for grilled cheese rolls?
Beyond just cheese, you can get creative with fillings. Adding ingredients like cooked bacon, spinach, tomatoes, or pepperoni can enhance the flavor profile. You could also create dessert versions by incorporating Nutella or peanut butter along with banana slices, providing something sweet to complement the savory offerings.
Can I cook Grilled Cheese Roll Ups in an air fryer?
Yes, cooking these tasty roll-ups in an air fryer is a fantastic option! Preheat the air fryer to the recommended temperature and place the rolled cheese bundles inside, brushing them lightly with butter for that extra crispiness. Cook until golden brown and enjoy a healthier twist with all the flavor you love!
Conclusion:
In summary, Grilled Cheese Roll Ups offer a delightful twist on a classic favorite, making them an excellent choice for quick meals or snacks. This recipe showcases the beauty of simplicity, allowing even novice cooks to create a delicious dish effortlessly. The flexibility of the roll ups extends beyond traditional cheese; feel free to experiment with various fillings such as deli meats, vegetables, or different cheeses to suit your taste. Additionally, the customization options mean you can adapt the recipe for dietary preferences, ensuring everyone can enjoy this tasty treat. With just a few ingredients and minimal preparation, you can elevate your culinary repertoire and impress your family or friends. Embrace your creativity and savor the quick satisfaction that comes from these lovable roll ups!
Print
Grilled Cheese Roll Ups: A Fun Twist on a Classic Favorite
- Total Time: 10 minutes
- Yield: Makes 4 roll-ups 1x
Description
These Grilled Cheese Roll Ups are a fun and creative way to enjoy the classic grilled cheese sandwich. Perfect for kids and adults alike, they offer all the delicious melty cheese you love in a neat, portable roll-up form!
Ingredients
- 4 slices of white or whole wheat bread
- 4 slices of cheddar cheese (or your favorite cheese)
- 2 tbsp butter, melted
- 1/2 tsp garlic powder (optional)
- 1 tbsp chopped parsley (optional, for garnish)
Instructions
- Prepare the Bread:
- Use a rolling pin to flatten each slice of bread. This helps make the roll-ups easier to shape.
- Assemble the Roll Ups:
- Place a slice of cheese in the center of each flattened bread slice. Roll up each slice of bread tightly, securing the cheese inside.
- Prepare to Grill:
- Brush each roll-up with melted butter, and sprinkle with garlic powder if desired for added flavor.
- Grill the Roll Ups:
- Heat a non-stick skillet over medium heat. Place the roll-ups seam side down in the skillet and cook for about 2-3 minutes, or until golden brown. Turn the roll-ups to grill all sides, ensuring the cheese is melted and the bread is crisp.
- Serve and Enjoy:
- Remove from the skillet and garnish with chopped parsley, if desired. Serve warm for a delicious snack or meal!
Notes
- Add some cooked bacon or tomato slices inside for a twist on the classic grilled cheese.
- For extra crispy roll-ups, you can lightly toast the bread before rolling it up.
- Serve with tomato soup or a dipping sauce for an added treat.
- Prep Time: 5 minutes
- Cook Time: 5 minutes
Nutrition
- Calories: ~150
- Sugar: ~2g
- Sodium: ~350mg
- Fat: ~7g
- Carbohydrates: ~18g
- Protein: ~7g
- Cholesterol: ~20mg