
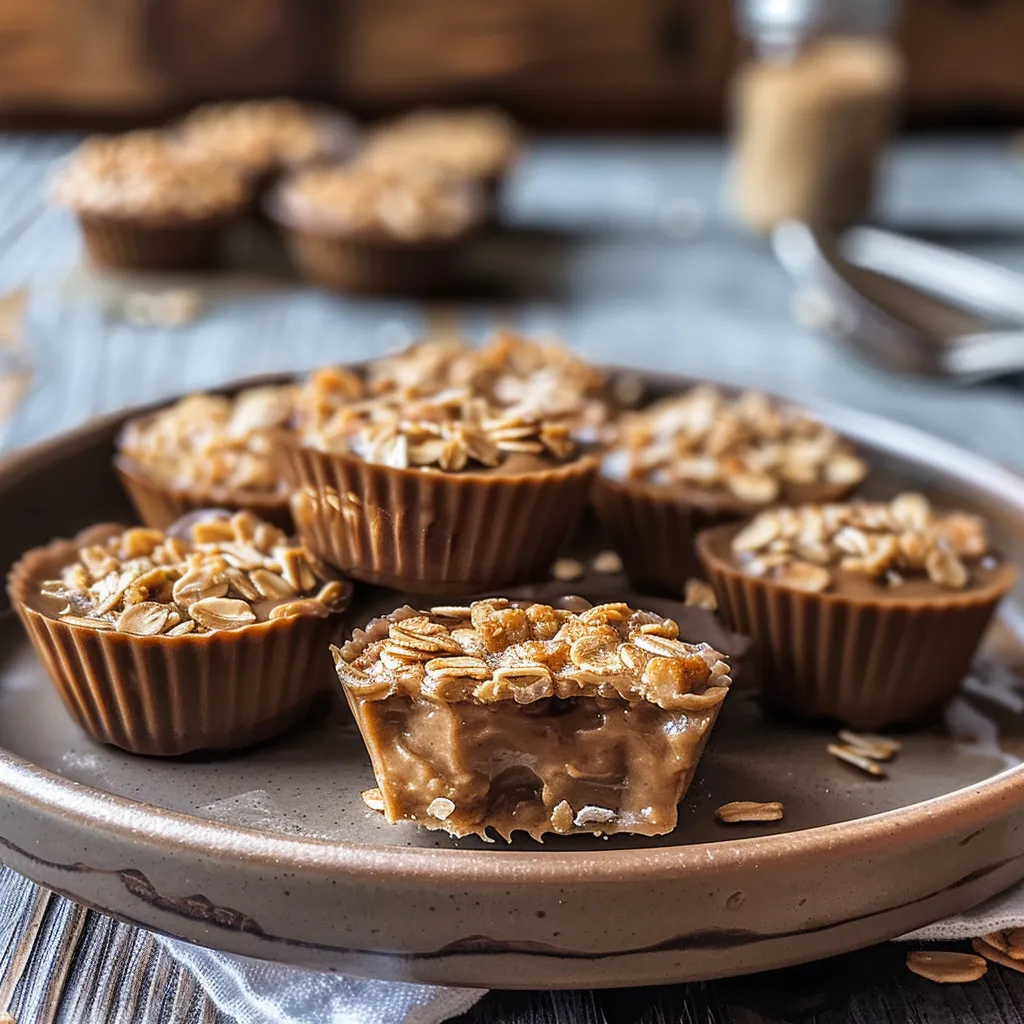
No-Bake Peanut Butter Oat Cups: Quick & Easy Treats
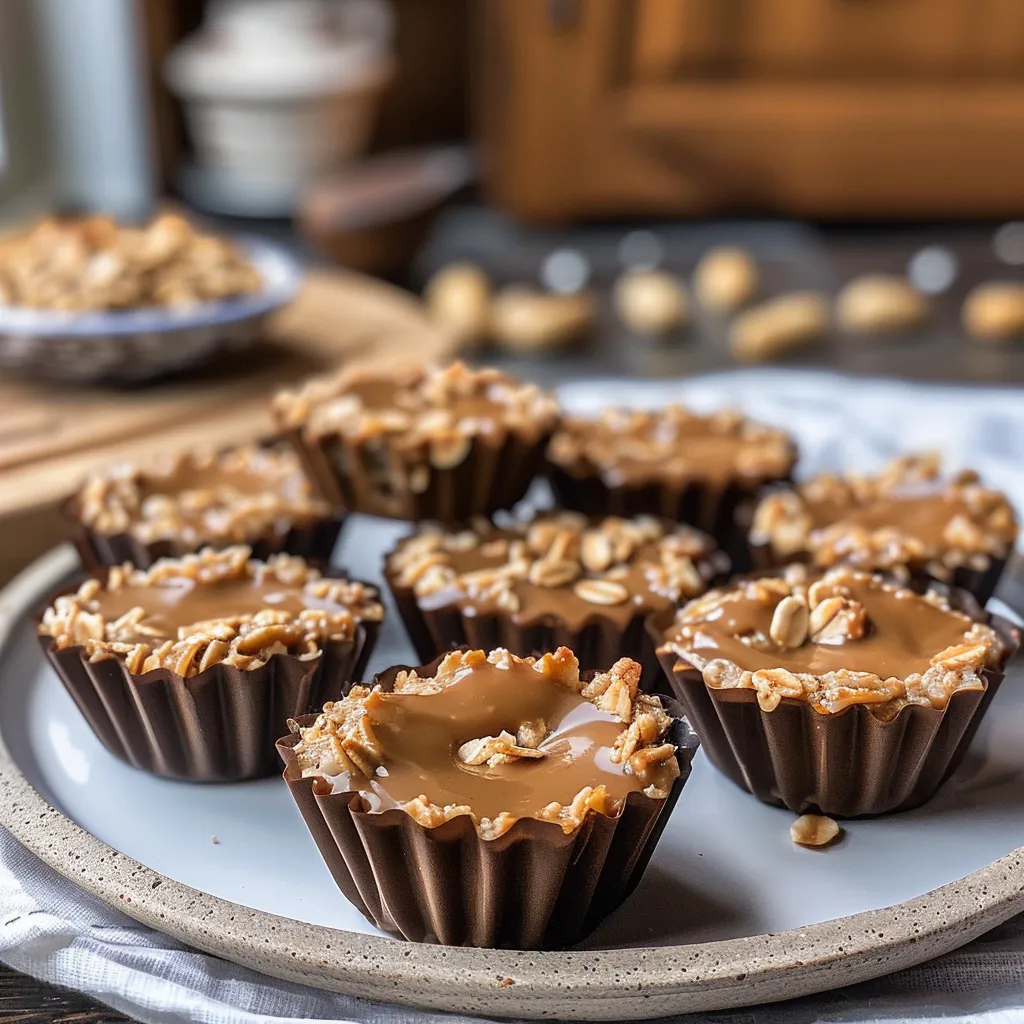
Craving a sweet treat that feels indulgent yet is effortlessly simple to create? Look no further than these delightful No-Bake Peanut Butter Oat Cups! Perfect for busy weekdays or spontaneous gatherings, these cups come together without ever needing an oven. Combining rich peanut butter with wholesome oats, they create a satisfying snack that is both nutritious and delicious.
The beauty of this recipe lies in its versatility. Feel free to customize your cups with exciting additions like chocolate chips, chia seeds, or even a sprinkle of cinnamon for an extra kick. For a protein boost, consider mixing in your favorite protein powder. Not only do these treats cater to a variety of tastes, but they also accommodate dietary preferences—just swap in almond butter for a nut-free alternative!
To achieve perfect results, allow the cups ample time to set in the fridge and use high-quality peanut butter for the best flavor. Get ready to impress your family and friends with this irresistible no-bake delight!
Ingredients for No-Bake Peanut Butter Oat Cups:
Base Ingredients
- 2 cups rolled oats – Use old-fashioned rolled oats for the best texture.
- 1 cup creamy peanut butter – Natural peanut butter without added sugar or oils works wonderfully.
- 1/2 cup honey or maple syrup – This adds sweetness and helps bind the ingredients together. Adjust to taste if desired.
- 1 teaspoon vanilla extract – Pure vanilla extract enhances the overall flavor profile of the cups.
Mix-Ins for Added Flavor
- 1/2 cup chocolate chips – Semi-sweet or dark chocolate chips can be added for a delightful touch.
- 1/4 cup chopped nuts – Almonds or walnuts provide a satisfying crunch and additional nutrition.
- 1/2 cup dried fruits – Options like raisins, cranberries, or chopped dates can add extra sweetness and chewiness.
- 1/4 cup shredded coconut – Unsweetened coconut flakes bring a tropical element to the recipe.
Sweetener Alternatives
- 1/2 cup agave nectar – For a lower glycemic index option, agave syrup can be used instead of honey.
- 1/2 cup brown rice syrup – This thick, sticky syrup is another great substitute for binding the ingredients.
Allergy-Friendly Variations
- Nut-free option: Substitute peanut butter with sunflower seed butter or soy nut butter for a nut-free treat.
- Gluten-free option: Ensure that the oats are certified gluten-free, or use a gluten-free oat blend.
Flavor Enhancements
- 1 teaspoon cinnamon or pumpkin spice – A dash of your favorite spice can elevate the cups’ flavor.
- 1/4 cup cocoa powder – For a chocolatey twist, blend in cocoa powder with the dry ingredients.
These varied ingredients will help you craft the perfect No-Bake Peanut Butter Oat Cups, tailored to your taste preferences and dietary needs!
How to prepare No-Bake Peanut Butter Oat Cups:
Creating delicious No-Bake Peanut Butter Oat Cups is simple and requires minimal cooking skills. Follow these clear steps for a perfect outcome.
Gather Your Ingredients
First, gather all required ingredients. You will need rolled oats, peanut butter, honey or maple syrup, vanilla extract, and a pinch of salt. Ensure you have everything on hand for a smooth preparation process.
Prepare the Mixing Bowl
Take a large mixing bowl and make sure it is clean and dry. This will be the vessel for combining your ingredients.
Combine Dry Ingredients
Next, add 2 cups of rolled oats into the mixing bowl. These oats will provide texture and heartiness to your cups.
Add Peanut Butter
Now, scoop 1 cup of creamy peanut butter into the bowl. Make sure you choose a natural variety for better flavor and texture.
Incorporate Syrup
Pour in ½ cup of honey or maple syrup. This will add sweetness and help to bind the mixture together.
Add Vanilla and Salt
Next, include 1 teaspoon of vanilla extract for flavor and a pinch of salt to enhance the overall taste of your mixture.
Mix Ingredients Thoroughly
Using a spatula or wooden spoon, combine all the ingredients in the mixing bowl. Mix until everything is well incorporated and forms a sticky dough.
Prepare the Muffin Tin
Grab a muffin tin and lightly grease it with cooking spray or line it with muffin liners. This will prevent the oat cups from sticking and make removal easier.
Scoop Mixture into Muffin Tin
Evenly distribute the peanut butter oat mixture into each muffin cup. Press down firmly to ensure they hold their shape once chilled.
Chill the Mixture
Place the muffin tin in the refrigerator for at least 30 minutes. This will allow the mixture to firm up and set properly.
Remove and Serve
Once chilled, carefully remove the No-Bake Peanut Butter Oat Cups from the muffin tin. Serve immediately or store them in an airtight container in the fridge for up to a week.
Enjoy your tasty and healthy treat with family and friends!
Tips for the Perfect No-Bake Peanut Butter Oat Cups
Creating delicious no-bake peanut butter oat cups is a straightforward process if you follow a few essential tips. These suggestions will help you achieve the best flavor and texture while accommodating different dietary needs.
1. Maintain the Correct Temperature
Temperature control is crucial when making these delectable treats. Ensure the peanut butter and any other melted ingredients are warm but not hot. Too high a temperature can alter the consistency of your mixture, making it easy to lose the desired texture. If your mixture feels too runny, place it in the fridge for a few minutes before forming it into cups, as this will help it firm up without compromising the flavors.
2. Use Quality Ingredients
The quality of your ingredients makes a significant difference in flavor. Opt for natural, unsweetened peanut butter that has no additives. This choice provides a rich flavor and better health benefits. Additionally, choose old-fashioned oats instead of quick oats for a chewier texture. If you’re adding chocolate chips or sweeteners, look for high-quality options, as their flavors also intensify the overall taste of the cups.
3. Suitable Substitutions for Dietary Restrictions
If you or someone you’re serving has dietary restrictions, several substitutions can work well. For a nut-free version, swap peanut butter with sunflower seed butter or tahini. To make the recipe gluten-free, ensure your oats are certified gluten-free. For a vegan option, use maple syrup instead of honey and check that your chocolate chips are dairy-free. These substitutions allow everyone to enjoy your no-bake treat without worry.
4. Add Flavor Variations
Consider adding new flavors to your oat cups for variety. Mix in a teaspoon of vanilla extract or a sprinkle of cinnamon to elevate the taste. Dried fruits like cranberries or apricots can add interesting textures and sweetness. For a chocolatey twist, try using cocoa powder along with the peanut butter, or mix in chocolate protein powder for an extra boost.
5. Proper Storage Techniques
Once your no-bake cups are formed, store them correctly to maintain freshness. Place them in an airtight container and store them in the refrigerator for up to a week. For longer storage, freeze them for up to three months. This way, you will always have a delicious and healthy snack ready at hand!
By following these tips, you can enjoy perfectly delicious oat cups that cater to various tastes and dietary needs.
Storage Tips for No-Bake Peanut Butter Oat Cups:
To keep your delicious no-bake peanut butter oat cups fresh and enjoyable, follow these simple storage tips. Proper storage not only extends their shelf life but also maintains their flavor and texture.
Optimal Storage Conditions
First, choose an airtight container for storage. This prevents moisture from getting in and keeps your treats from becoming stale. Glass or high-quality plastic containers with tight-fitting lids work best. Line the bottom of the container with parchment paper if you want additional protection against sticking.
Store the container in the refrigerator. The cool environment helps keep your oat cups firm and extends their freshness. Avoid placing them in the door, as the temperature fluctuates more there. Instead, opt for a middle shelf where temperature remains consistent.
Maintaining Freshness
If you prefer to enjoy your treats later, consider freezing them. Wrap each oat cup individually in plastic wrap to prevent freezer burn. Place the wrapped cups in a freezer-safe bag or container, ensuring you remove as much air as possible. This method maintains their taste and texture for up to three months.
To thaw, simply move the cups from the freezer to the refrigerator a few hours before you plan to enjoy them. If you’re in a hurry, you can leave them out at room temperature for about 30 minutes. Do not microwave them directly from the freezer, as this can alter the texture and flavor.
Shelf Life Tips
Your no-bake treats will last for about one week in the refrigerator. Always check for any signs of spoilage, such as changes in texture or odor, before consumption. If you notice any changes, it’s best to discard them to ensure safety.
Additionally, keep an eye on the ingredients you used. Natural ingredients may have varying shelf lives. For example, honey or maple syrup can help preserve and enhance freshness. However, it’s wise to consume your oat cups within the recommended storage periods to enjoy them at their best.
By following these storage tips, you’ll enjoy your peanut butter oat cups for days, ensuring they remain a delightful treat ready for snacking or sharing!
Related Recipes to Explore
If you love No-Bake Peanut Butter Oat Cups, you might enjoy these similar treats that combine flavor and simplicity. Each of these recipes offers a unique twist but shares ingredients and methods that make them perfect companions to your peanut butter oat delight.
1. Chocolate Hazelnut Energy Bites: These energy bites utilize oats and nut butter just like the no-bake cups. They combine hazelnuts and cocoa powder, giving you a rich, chocolatey experience. They are quick to prepare and serve as an excellent on-the-go snack, much like the oat cups. Both recipes provide a healthy energy boost, ideal for a pre-workout snack or an afternoon pick-me-up.
2. Coconut Almond Bliss Balls: If you’re looking for a tropical twist, these bliss balls feature shredded coconut and almond butter. They are rolled into bite-sized pieces, making them perfect for sharing. The use of oats in both recipes creates a similar chewy texture, while the almond flavor pairs beautifully with the peanut butter. Enjoy them side by side for a balanced snack selection.
3. Chewy Granola Bars: These bars offer a chewy, satisfying alternative to your no-bake treat. They incorporate oats and nut butter, making them a nutritious addition to your snack arsenal. With their customizable toppings, such as dried fruits and dark chocolate chips, these granola bars complement the sweet and nutty flavors of your oat cups while adding a fun variety.
4. Banana Oat Cookies: Easy to prepare, these cookies use ripe bananas and oats to create a soft, wholesome snack. The natural sweetness from bananas complements the nutty flavors of the oats and peanut butter. These cookies serve as a delightful dessert that fits well with your no-bake creation.
Each of these recipes shares key ingredients and preparation techniques. They provide an exciting array of flavors while maintaining the health benefits you love. Dive into these treats for a satisfying snack experience!
Frequently Asked Questions:
What ingredients do I need for no-bake peanut butter oat cups?
To create these delightful no-bake treats, you’ll need a combination of rolled oats, creamy peanut butter, honey or maple syrup for sweetness, and chocolate chips for a rich flavor. Some variations might include natural nuts, seeds, or dried fruits to enhance the taste and texture. The beauty of these oats cups lies in their versatility, allowing you to add your favorite ingredients.
How long does it take to prepare no-bake peanut butter oat cups?
The preparation of these delectable oat cups is quite quick and easy. You can whip up the mixture in just 10-15 minutes. However, you will need additional time for them to set properly in the refrigerator, ideally about 30 minutes to an hour. This no-bake recipe makes it a convenient treat for those short on time.
Can I make these oat cups gluten-free?
Absolutely! To make your no-bake peanut butter oat cups gluten-free, simply use certified gluten-free oats. This ensures that no gluten contamination occurs, making it a safe and enjoyable option for those with gluten sensitivities or celiac disease.
How should I store my no-bake peanut butter oat cups?
For optimal freshness, keep your oat cups in an airtight container. They can be stored in the refrigerator for up to a week. Some people also choose to freeze them for longer storage, making them a perfect grab-and-go snack when you need a quick energy boost.
Can I substitute ingredients in this recipe?
Yes, ingredient substitutions are entirely possible with these no-bake treats. You can swap out peanut butter for almond or cashew butter if you prefer a different nut flavor. Similarly, honey can be replaced with agave nectar, and you can choose other sweeteners to match your dietary needs.
Are no-bake oat cups a healthy snack option?
These delightful treats are a wholesome choice for a snack. The oats provide fiber, while peanut butter offers beneficial protein and healthy fats. When made with natural sweeteners and minimal added sugars, they serve as a nutritious option for satisfying sweet cravings without compromising health.
Conclusion:
In summary, the No-Bake Peanut Butter Oat Cups offer a delightful and straightforward approach to satisfying your sweet cravings without turning on the oven. With minimal ingredients and simple preparation steps, these cups embody both ease and convenience. The flexibility of this recipe allows for endless customization options; feel free to experiment with add-ins like chocolate chips, dried fruits, or nuts to match your taste preferences. This adaptability ensures that you can cater to various dietary needs while maintaining family-friendly appeal. Whether enjoyed as a quick breakfast, mid-day snack, or dessert, these no-bake treats can fit seamlessly into your lifestyle. So gather your ingredients and give this recipe a try—you’ll enjoy not only the delicious flavors but also the joy of creating something unique that suits your palate perfectly!
Print
No-Bake Peanut Butter Oat Cups: Quick & Easy Treats
- Total Time: 35 minutes
- Yield: 8-10 cups 1x
Description
These no-bake peanut butter oat cups are a simple, delicious, and satisfying treat with a perfect balance of sweetness and crunch. Great for a quick snack or dessert!
Ingredients
- 1 cup peanut butter (creamy or crunchy)
- 1/2 cup honey or maple syrup
- 1 1/2 cups rolled oats
- 1/4 cup dark chocolate chips (optional)
- 1/2 tsp vanilla extract
- A pinch of salt
Instructions
- In a mixing bowl, combine the peanut butter, honey (or maple syrup), and vanilla extract. Stir until smooth.
- Add the rolled oats and salt, and mix until well combined.
- Line a muffin tin with paper liners and scoop the mixture evenly into each cup.
- Press down gently with the back of a spoon to pack the mixture.
- (Optional) Sprinkle the chocolate chips on top of each cup.
- Refrigerate for at least 30 minutes or until firm.
- Remove from the muffin tin and enjoy!
Notes
- You can store them in the fridge for up to a week.
- Feel free to add nuts, dried fruit, or seeds for extra texture and flavor.
- Prep Time: 5 minutes
- Cook Time: 30minutes
Nutrition
- Calories: 180
- Fat: 9g
- Carbohydrates: 20 g
- Fiber: 3g
- Protein: 6g