
No Bake Oreo Dessert Cups: Easy & Delicious Treats
Delight in the decadence of a dessert that requires no oven—introducing No Bake Oreo Dessert Cups! These indulgent treats are not only simple to prepare, but they also promise a heavenly combination of creamy layers and the iconic crunch of Oreo cookies. Perfect for entertaining guests or enjoying a sweet moment alone, this dessert can be easily customized to suit your preferences.
Consider adding a twist with different flavors of Oreos, like mint or peanut butter, or experimenting with various toppings such as whipped cream, chocolate sauce, or fresh fruit. For those who like a little extra flair, try incorporating a splash of your favorite liqueur into the creamy filling. Expert tips for achieving the best results include chilling the cups for adequate time, ensuring the layers meld together beautifully, and using high-quality cream cheese for a richer flavor. Impress your friends and family with this delightful no-bake treat that radiates joy in every bite!
Ingredients for No Bake Oreo Dessert Cups:
Creating the delightful No Bake Oreo Dessert Cups is a breeze with the right ingredients. Below is a detailed list of what you will need to whip up this delicious treat for 8-10 servings.
For the Oreo Crust:
- 24 Oreo cookies – crushed into fine crumbs
- 1/4 cup unsalted butter – melted
For the Creamy Filling:
- 1 cup heavy whipping cream
- 8 ounces cream cheese – softened to room temperature
- 1/2 cup powdered sugar
- 1 teaspoon vanilla extract
- 1 cup Oreo cookie crumbs – for mixing into the filling
For the Topping:
- 2-3 Oreo cookies – coarsely chopped for garnish
- Whipped cream – for top garnish (optional)
- Chocolate sauce – for drizzles (optional)
Optional Flavor Variations:
If you’re feeling a bit adventurous, consider the following variations to switch up the classic recipe:
- Mint Chocolate: Add 1/4 teaspoon of mint extract to the filling for a refreshing twist.
- Peanut Butter Delight: Incorporate 1/2 cup of smooth peanut butter into the cream cheese mixture for a nutty flavor.
- Chocolate Lovers: Use chocolate-flavored Oreos for the crust and additional cocoa powder in the filling for a rich chocolate dessert.
- Fruit Fusion: Add a layer of your favorite fruit jam or sliced strawberries in between the Oreo filling and the crushed cookies for a fruity kick.
Experimenting with these alternatives can add a unique flair to your dessert cups, ensuring every event you host is special. Don’t forget to have fun while creating this delightful treat!
How to prepare No Bake Oreo Dessert Cups:
Follow these easy steps to create a delightful dessert that requires no baking. Perfect for any occasion, Oreo Dessert Cups will impress your friends and family!
Step 1: Gather Your Ingredients
Start by collecting all the necessary ingredients to ensure a smooth preparation process. You will need Oreo cookies, cream cheese, powdered sugar, vanilla extract, whipped topping, and extra Oreos for topping.
Step 2: Crush the Oreo Cookies
Take about 20 Oreo cookies and place them into a zip-top bag. Use a rolling pin or a heavy object to crush the cookies into fine crumbs. This will serve as the base for your dessert cups.
Step 3: Prepare the Cream Cheese Mixture
In a mixing bowl, add 8 ounces of softened cream cheese, 1 cup of powdered sugar, and 1 teaspoon of vanilla extract. Mix the ingredients using an electric mixer until the mixture is smooth and creamy, ensuring no lumps remain.
Step 4: Fold in the Whipped Topping
Gently fold in 1 cup of whipped topping into the cream cheese mixture. Use a spatula to combine the two mixtures without deflating the whipped cream, maintaining that light and airy texture.
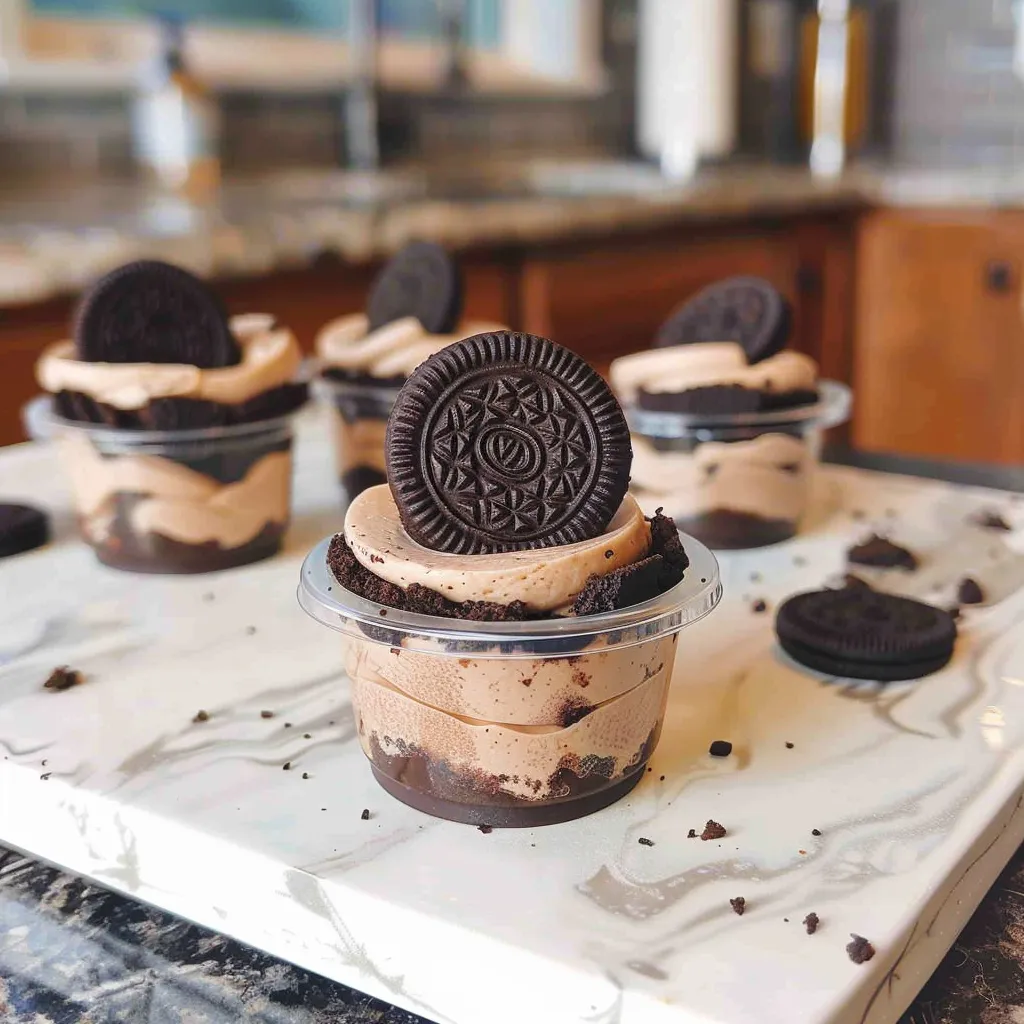
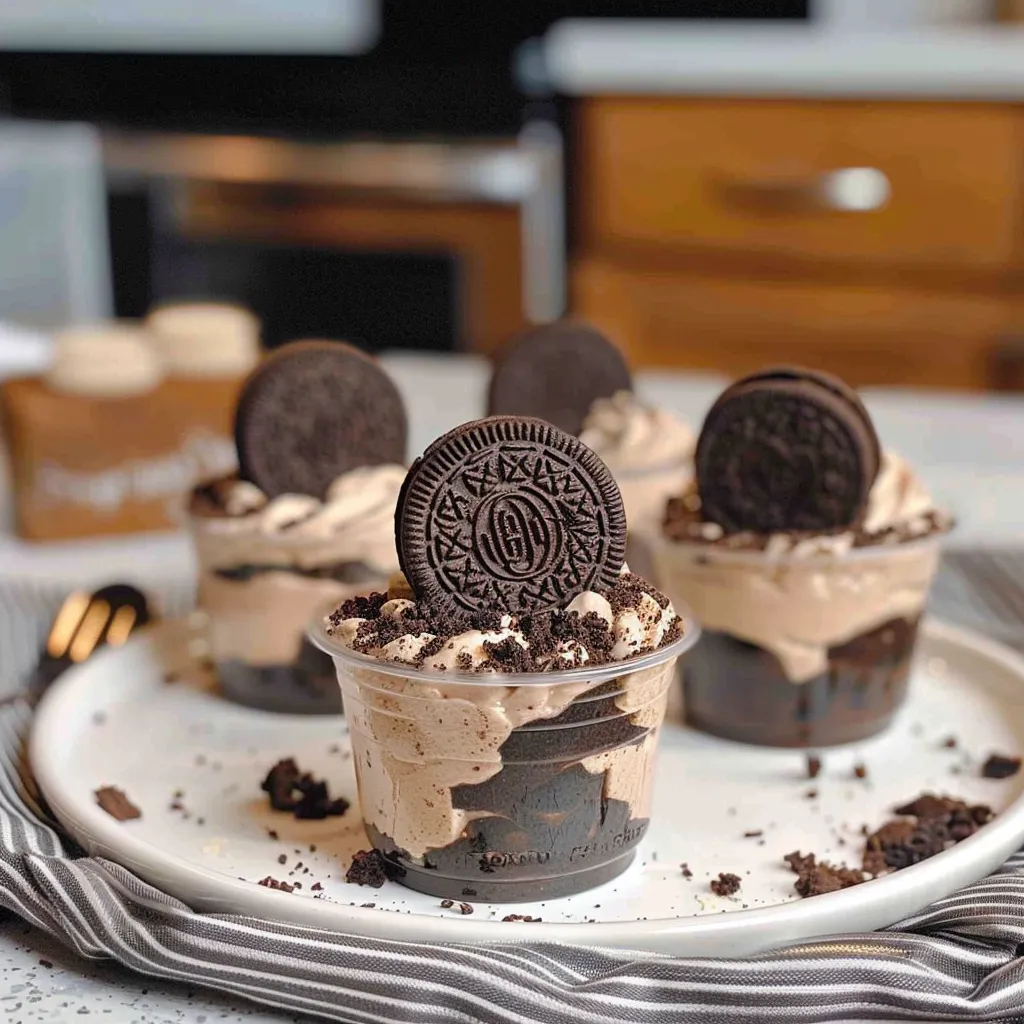
Step 5: Layer the Oreo Dessert Cups
Begin assembling your dessert cups by adding a layer of the crushed Oreo cookies to the bottom of each cup. Use about two tablespoons of crumbs for a firm base.
Step 6: Add the Cream Cheese Mixture
On top of the Oreo base, spoon a layer of the cream cheese mixture into each cup. Be generous, as this is the star of your dessert!
Step 7: Repeat the Layers
Continue layering the crushed Oreos and the cream cheese mixture until the cups are filled. Aim for two to three layers for a visually appealing dessert.
Step 8: Garnish with Toppings
Crush a few more Oreos and sprinkle the crumbs over the top of each dessert cup as a finishing touch. You can also add some additional whipped topping for extra flair.
Step 9: Chill Before Serving
Cover the dessert cups with plastic wrap and refrigerate them for at least 2 hours. This chilling time allows the flavors to meld beautifully.
Serve chilled and watch everyone enjoy these irresistible treats!
Tips for the Perfect No Bake Oreo Dessert Cups
Ingredient Quality Matters
Using high-quality ingredients can significantly enhance the flavor of your dessert. Choose fresh Oreos; expired cookies can lead to a stale taste. Opt for a good quality cream cheese and whipped cream. These ingredients are the backbone of the dessert, and their quality can make a noticeable difference. When possible, use full-fat cream cheese for a richer texture and taste.
Maintaining the Right Temperature
Always ensure your cream cheese is at room temperature before mixing. This step prevents lumps and ensures a creamy consistency. If using whipped cream, chill the mixing bowl and beaters for about 10 minutes before whipping. Cold equipment helps achieve better peaks. After preparing your dessert cups, refrigerate them for at least 4 hours or overnight. This time allows the flavors to meld and the dessert to set correctly.
Perfecting the Layering Technique
Layering the different components of your dessert properly adds to both the visual appeal and flavor. Start with a base of crushed Oreos, followed by the cream cheese mixture, and top with whipped cream. Repeat these layers to create an attractive contrast. For an extra touch, sprinkle some crushed Oreos on top before serving. This step not only enhances the flavor but also adds a nice texture.
Dietary Substitutions
If you have dietary restrictions, there are easy substitutions you can make. For a gluten-free option, use gluten-free chocolate sandwich cookies. Instead of cream cheese, try a dairy-free cream cheese alternative or whipped coconut cream for a vegan-friendly version. Keep in mind that the texture and taste will vary slightly, but the overall experience will remain delicious.
Storing and Serving Suggestions
Store any leftovers in an airtight container in the refrigerator for up to three days. If you want to serve them later, you can prepare the layers separately and assemble just before serving. This method keeps the cookies from getting soggy. For festive occasions, consider garnishing with chocolate shavings or fresh berries to make the dessert visually appealing.
By following these simple tips, you’ll create delightful Oreo dessert cups that everyone will rave about!
Storage Tips for No Bake Oreo Dessert Cups:
To enjoy your No Bake Oreo Dessert Cups for days or even up to a week, follow these storage tips. Proper storage helps maintain the dessert’s texture and flavor while preventing spoilage.
Optimal Storage Conditions
Store your dessert cups in the refrigerator to keep them fresh. Use airtight containers to prevent exposure to air, which can cause them to dry out or absorb other odors. If you’re planning to enjoy them over multiple days, consider separating the layers of ingredients. Keep the whipped cream topping in a separate container to avoid sogginess.
Maintaining Freshness
Make sure the dessert cups cool completely before sealing them. Warm desserts lead to condensation inside the container, which compromises the quality. If you have leftover Oreo cookies, crush them and sprinkle them on top just before serving. This keeps the crispy texture intact, enhancing the overall experience when indulging in your delicious treat.
Shelf Life of No Bake Oreo Dessert Cups
In the refrigerator, your dessert cups should remain fresh for about 4 to 5 days. Always check for any signs of spoilage, such as off smells or a change in texture. If you notice any changes, it’s safer to discard the dessert. For longer storage, consider freezing individual cups. Cover them tightly with plastic wrap or aluminum foil before placing them in a freezer-safe bag.
Freezing for Longer Storage
To freeze, remove the whipped cream topping and keep it separate. Place the cups in the freezer for up to 1 month. When ready to enjoy, transfer them back to the refrigerator and let them thaw overnight. Add any toppings just before serving to ensure the best possible texture. This way, you can indulge in your No Bake Oreo Dessert Cups whenever the craving hits!
By using these storage tips, you can enjoy your dessert cups at their best for as long as possible. Implementing a few simple practices will enhance your dessert experience and keep it fresh and delightful.
Related Recipes
If you enjoyed the delightful No Bake Oreo Dessert Cups, you may find these similar recipes both easy to make and equally irresistible. Each one offers unique flavors and textures that complement the creamy, chocolatey goodness of the dessert cups.
First, consider trying Chocolate Mousse Cups. Made with whipped cream, rich chocolate, and a hint of vanilla, these mousse cups provide a smooth, airy contrast to the dense layers of Oreos. The lightness of the mousse balances the creaminess, creating a well-rounded dessert experience.
Next, explore Nutella Cheesecake Bites. These bite-sized treats combine the rich flavor of Nutella with a soft cheesecake filling. The chocolate-hazelnut taste beautifully pairs with the crushed Oreos used in the cups, enhancing the overall dessert theme. Plus, they require no baking, just like the Oreo dessert, making them a perfect addition to your no-bake repertoire.
Another option is Peanut Butter Chocolate Dirt Cups. This layered dessert combines creamy peanut butter, crushed cookies, and rich chocolate pudding. The combination of peanut butter and chocolate harmonizes splendidly, echoing the chocolate-cookie base of the Oreo cups while adding a fun, nutty twist.
Lastly, try making Mini Key Lime Pies. These tart, refreshing pies provide a contrast to the chocolatey flavors from the dessert cups. The zesty lime and creamy texture complement the sweetness and richness, offering a delightful balance on your dessert table.
Explore these recipes to expand your no-bake dessert collection, each bringing its unique flair while still echoing the deliciousness of the original treat.
Frequently Asked Questions:
What are No Bake Oreo Dessert Cups made of?
No bake Oreo dessert cups are typically composed of crushed Oreo cookies, cream cheese, whipped topping, and vanilla extract. These ingredients come together to create a rich and creamy filling nestled in a base of crushed Oreos. The texture is a delightful blend of crunchy and creamy, making it a favorite for dessert lovers.
How long do No Bake Oreo Dessert Cups need to set?
To achieve the best texture and flavor, these delicious dessert cups should be refrigerated for at least 2 to 4 hours. This chilling period allows the mixture to firm up and the flavors to meld beautifully. For a more pronounced taste, consider letting them chill overnight; they are often even better the next day.
Can I use other cookies instead of Oreos?
Absolutely! While Oreos are the star of the show, you can easily substitute them with other cookie varieties like chocolate sandwich cookies or even graham crackers for a different flavor profile. The key is to maintain a similar texture so your dessert cups remain cohesive.
Are these dessert cups suitable for dietary restrictions?
You can modify this treat to accommodate various dietary restrictions. For a gluten-free option, use gluten-free sandwich cookies, and for a vegan version, substitute cream cheese with vegan alternatives and use dairy-free whipped topping. Always check ingredients to ensure they align with your dietary needs.
How can I garnish my Oreo dessert cups?
Garnishing is a fun way to enhance the visual appeal of your no bake treat. Consider topping them with whipped cream, crushed Oreo crumbs, chocolate shavings, or a drizzle of chocolate or caramel sauce. Fresh berries or mint leaves can also add a refreshing touch.
Can I make No Bake Oreo Dessert Cups in advance?
Yes, these delectable cups are perfect for making ahead of time. Prepare them a day or two before your event, and simply keep them chilled until you’re ready to serve. This not only saves you time but also lets the flavors develop, resulting in an even more delightful dessert for your guests.
Conclusion:
No Bake Oreo Dessert Cups stand out as a delightful treat that combines simplicity and indulgence. This recipe is an ideal choice for anyone looking to whip up a tasty dessert without the hassle of baking. With just a few ingredients, you can create a creamy, chocolatey masterpiece that appeals to all ages. One of the joys of this recipe is its flexibility; feel free to experiment with different add-ins like fruits, nuts, or flavored extracts to personalize your dessert. Additionally, you can adjust the sweetness or incorporate alternative cream options to suit dietary preferences. Overall, these dessert cups offer endless possibilities for creativity, making them a fantastic addition to any gathering, celebration, or cozy night in. Try them out and impress your friends and family with this easy yet elegant treat!
Print
No Bake Oreo Dessert Cups: Easy & Delicious Treats
- Total Time: 10 minutes
- Yield: 6 mini dessert cups 1x
Description
Craving a quick and irresistible dessert? These No Bake Oreo Dessert Cups are layered with crushed Oreos, creamy filling, and whipped topping for a sweet treat that’s ready in minutes—no oven required!
Ingredients
-
12 Oreo cookies, crushed
-
8 oz cream cheese, softened
-
1/2 cup powdered sugar
-
1 tsp vanilla extract
-
1 cup whipped topping (like Cool Whip)
-
Extra crushed Oreos for garnish
-
6 small serving cups
Instructions
-
Crush the Oreos: Use a food processor or a zip-top bag and rolling pin to crush the Oreos.
-
Make the filling: Beat cream cheese, powdered sugar, and vanilla extract until smooth. Fold in the whipped topping until well combined.
-
Layer the cups: Add a spoonful of crushed Oreos to the bottom of each cup. Top with a layer of the creamy filling. Repeat the layers as desired.
-
Top and chill: Finish with a sprinkle of crushed Oreos on top. Chill for 30 minutes for best texture—or enjoy immediately!
Notes
-
Make it extra special with mini chocolate chips or a drizzle of chocolate syrup.
-
Store in the fridge for up to 2 days—great for prepping ahead.
-
You can substitute mascarpone for a richer, cheesecake-like flavor.
- Prep Time: 10 minutes
- Cook Time: 0 minutes
Nutrition
- Calories: 290
- Sugar: 20g
- Sodium: 180mg
- Fat: 18 g
- Carbohydrates: 29g
- Protein: 3g